Pages

Thursday, 10 May 2012

Present


It was a lazy Sunday morning on 1st April; agenda of the day was to trace a perfect birthday gift for my husband.


It had been 3 long years in the relationship but this was his first birthday  after marriage to celebrate together .He worked for an international cruise liner then thus was always out stationed.

I wanted the gift to be trendy, resourceful and something I could be proud to have gifted him.

I hated this but anytime we entered any mall and came across an electronic section my husband was seen stuck like magnet there. I could see his eyes glued to these android smart phones and the kind of satisfaction he got exploring each of the handsets.
My intuition said a smart phone would be a perfect pick and Samsung galaxy S among the best.

I had less knowledge of its features but my brother had the same handset so was pretty assured that it was a good investment. I may be weak in technology but excellent with my bargaining skills. I did manage to get the handset at a reasonable rate than the quotes in malls.

I had 3 days left before the birthday to make arrangements for a new prepaid connection. After a day of research on connectivity, billing, services offered by different companies I finally got a Vodafone connection. I was more impressed with their creative advertisements and marketing strategies than statistics.

It was the 5th April and I couldn’t resist gifting him the fully operational “Samsung galaxy S”. He knew I had a surprise for him so without wasting a minute I gifted him the phone. I loved his smile increasing in millimeters as he unwrapped the box. He was amused to have a gift like this.
 MISSION COMPLETED!

But little did I realize that these so called android gadgets could consume the available personal space with my husband. Now I could see my husband updating and downloading all the available apps from the android market. He was always busy and all engaged with his gadget. I could hear the beeps and update alerts at midnight also. Yes I did get my space with a 50% love shedding.
It was one fine morning that my husband forgot to carry his smart phone. That’s the time when I actually explored the phone. And to my surprise it was fun to use internet on mobile. Some points I could list out:


I had used all these applications at my work station but never on a 4inch screen that was so handy. I was so proud to have something so useful for both of us. That evening I made a deal with my Husband – to have the custody of the phone in the evenings.


Saturday, 28 April 2012

Personalized Cushion


 Personalized Cushion:


Being in hospitality we always talk about customer delight. We try to anticipate the customer needs and customize our product. Recently I was a part of a brain-storming session on Innovative ideas to delight a customer.

We considered all kind of customers and their needs. As we went on an idea struck me. How much do we think of our toddler guest who may be our future guests in years to come. Yes we have towel art, indoor games and the end.

As this month is an onset of vacation for most of the children. Hotels seem to be occupied with families. It’s a beautiful scenario with cute, colorful and whizzling little guests all around the hotel .It’s the only time parents get to spend some quality time with their children. Now this is where we can exceed guest expectation.

This post I show how to make a personalized cushion for kids that can be placed in cribs or on bed. This can be easily made by the hotel seamstress and used when required

Material Required: Felt cloth, embroidery thread, embellishments, polyfiber (synthetic cotton).

Procedure:   Take 1metre of felt cloth and fold it into half. A bright color felt looks more appealing.
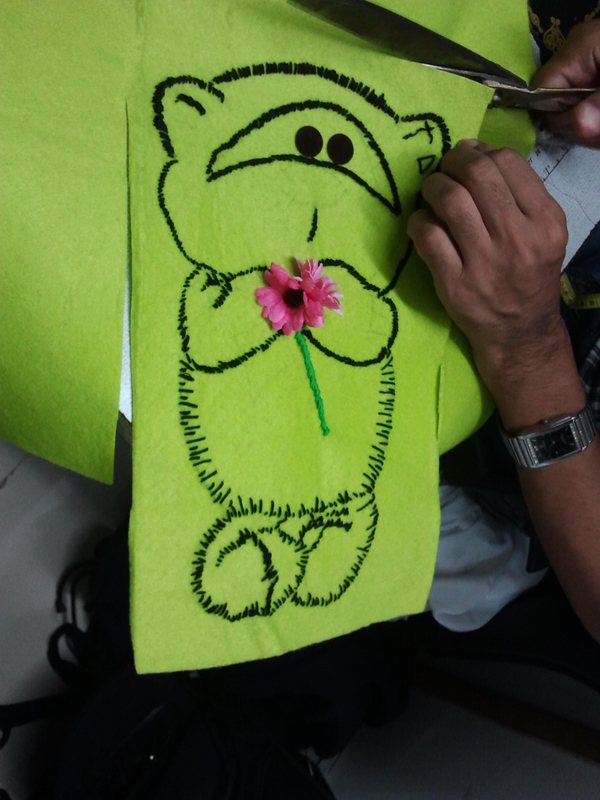
Sketch out a cute figure with a pencil on the fabric. I have drawn a cute teddy bear as this is something most of the kids adore.


I have done embroidery on the sketched figure to give a raised effect. I have used basic long and short stitches and back stitches to give a sketch effect on the fabric. The stitches are so easy that a first timer can also try this out.


This is how I kept trying alternate long and short running stitches.


I attached some artificial flowers on the hands of the teddy to give it a welcoming image.


To show the stock of flowers I have done some back stitches with a green embroidery thread. You could see that in the picture below.

For eyes you could use regular bindis or artificial eyes available in stationary store. While I was stitching the fabric I have used bindis for the eyes.


After the embroidery is complete cut the fabric into 2 equal parts as shown in the picture below.


To attach these parts make a cylindrical cut out of the fabric about 4inchs in length as shown in the picture below.


If you don’t have a sewing machine gets it done from a local seamstress as per your requirements.

After stitching it will something like this in the picture below. One side of the cushion should be left open to insert the poly fiber.


Insert the polyfiber inside and close the open end.


Polyfiber is easily available in an upholstery shop. Use polyfiber as filler because it is washable and easy to maintain. 


Finally fix the nose. You could do it before filling the polyfiber also.


Thus your cute tots cushion is ready.


Friday, 30 March 2012

Embroidery designed purse


Back on the blogging scene after a long hiatus.

It’s a beginning of a new life post marriage. I try to recall mom’s recipes, resource managing tactics, budgeting, inventory of items and so much more.
I now realize I have become my mom’s replica, my idol in true sense. 

It was in 90’s when mom used to sit with these Assami ladies at the military cantonment and learnt knitting. She has since mastered all the forms of thread work.

I used to hate it when she told me to roll out balls out of the twisted woollen yarn that she brought from the market. Little did I realize then that someday I would develop the same liking? This post is dedicated to my mom.

As I teach some basic stitches to my students, thought of being creative, went ahead and designed a handmade, embroidered purse.


You will need: felt cloth: ½ meter, embroidery thread, needle, scissor and polyfiber sheet-1/2 meter, white fabric -1/2 meter, 


embellishments of your choice.


 Take a ½ meter felt cloth and fold it into half.


Cut out a rough outline of the desired shape of the purse on a piece of paper, which will then be placed on the folded felt material and cut accordingly.


 Below you can see the cut out of the felt fabric. You can make any desired shape of the fabric for the purse.


Make equidistant lines with the pencil on the felt, which makes stitching easier.
I have made 5 equidistant rows on the front side of the fabric. 


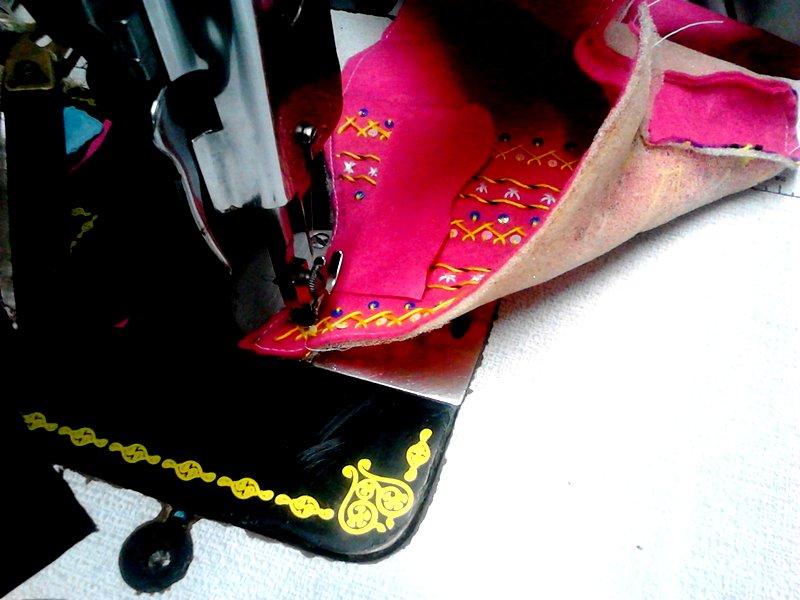
I have used 2 types of stitches in alternate rows which are then decorated with some colorful embellishments.

1) Herringbone stitch: it will be easy for you all to do these stitches if you refer to the link below.I have been referring to her website for a while now and love the way she has presented  the different stitches.


2) Running whipped stitch: it’s the easiest of the designs and comes out well if used with good color combination.
link below explains the steps for the running whipped stitch.


Between the whipped stitches I have done a double cross stitch with the white thread.


This is how the front side of the purse looks with alternate’s stitches and decorated with embellishments.


  After that the embroidery is done, it’s time to assemble the fabric into a purse.

To make the purse more durable I have used a thin sheet of polyfiber which you always find in the form of shirt inserts.

Cut the polyfiber and white cotton fabric to the shape of the purse. 


Now cut 3-4 inches of cylindrical felt fabric to form the joint and also increase the width of the purse.


With the help of a sewing machine stitch the 3 layers of felt, polyfiber and white cloth together and then attach the joints on the sides like the picture below.


 This is how the purse should look after stitching.


This is how the purse looks on the back side.


Lastly the zipper to be attached on the open end to make the bag more secure.
Thus your purse is ready.


It always gives me a feeling of content and pride to come out with such creative things.

See you soon.

Tuesday, 7 February 2012

A Goodbye

 Welcome Again,


                            We keep meeting different people some stay, some leave us. I feel its’ important to make someone feel special for their existence in our life for a period.  
I had one of my colleague leaving the institute and thought of greeting her good bye in a creative way.  She has always been experimental in all ways hence thought of using the header “STAY NEW”.


Now I had a group of creative minds from first year who brought the entire imagination on paper.
 Sketching would have taken time so took a photo copy of an image. Made a perfect cut and stuck it on a card cover.
 We wanted to highlight the features in the image for which we used an acrylic highlighter on the hair.


The black highlighter helped to enhance the beauty in eyes also.


You may see some red beads in one corner which were used for the bag strap.
The card was left to rest so that the beads would adhere to it properly.


   Silver glitter was used for the words and to highlight the hair.
Red color pencil is used for the hair scarf. 


Lastly we added some red glitter spot to create a design. This actually gave an embossed effect to the picture.


Thus the card is ready.


We  also made a see through insert for the greeting card.
First the card size was measured and then a bigger size card paper was cut. 


 Then a window was made on one side of the paper and gelatin paper was stuck.


Finally we made some designs on the sides of the inserts.


And this was the final product. It always a delight for a teacher to see what you imagine is the same you get from the students.
Aiswarya ,siddhesh,Anu, Sateyendar,Prateek   - KEEP UP THE GOOD WORK.


Monday, 6 February 2012

simple yet beautiful


I recently visited the dagdusheath  halwai ganpati  in pune when I was stunned to see the beautiful peacock feathers at a shop. I couldn’t resist purchasing them. I just admire the beauty of Mother Nature.


You could check my first post a demonstration on how to make a tissue flower, some of them I have used in the pictures below.


I have tried using them to make an arrangement along with peacock feathers.
The vibrant colors of peacock feathers can be used to make an arrangement and it looks beautiful.


Also below you can see some paper flower arrangement which serve a good alternative for flowers in case of emergency.