Pages

Tuesday, 29 November 2011

Handmade cushions


Cushions: You cuddle them, are comforted by them and at times shed tears on them. It is a synonym of comfort and elegance.
 This post is on handmade cushions where in I have used my skills to enhance the appearance. I ended up making one of the cushions in my train journey to Jamnagar and back. It’s easy to make and an excellent work of art to enhance the room décor.


Material required: 1 ½m satin cloth, tailors chalk, Sewing needle and thread, scissors and poly fiber (1kg)


      I.            Procedure: First take 11/2 m cloth lengthwise and divide it into 2 equal parts. This length gives you 2 exactly sized cushions.


      I.            Now measure 5inches with a ruler from the end of the cloth and cut a 5 inch cloth from both the parts. Keep this cut piece aside as we use it to make the center of the cushion.


      I.              Take first part of the cut fabric. Place the mat surface of the cut fabric facing you.
  II.            Now draw 2 inch wide lines horizontally and vertically with a tailors chalk. A tailor’s chalk is easily available in stationary shop –this chalk is more prominent on the cloth surface and easy to use on fabric.


      I.            After drawing the lines you will find equidistant squares on the cloth.
  II.             Draw a diagonal line in alternate squares in a column; repeat the same procedure in the alternate column. 
      I.            In the empty adjacent column draw diagonal lines in opposite direction again. Look at the picture below for clarity.


      I.            After drawing lines, with the help of sewing needle and thread make 2 pleats following the diagonal line in Single Square as shown in the picture below.


Complete the pleats on the entire fabric.


After pleating the fabric should look something like this


                Ball puffs : We have to utilize the 5inch cut fabric and poly fiber for making the balls


Take one piece and divide it into 2 equal parts thus we make 2 balls from a single piece. The cut fabric should look something like this.


Take 1 piece of fabric and insert poly fiber in the form of a ball. Stitch the fabric on the wool with a thread.
4 balls can be made from the 4inch cut fabric.


Now at one of the ends with the help of a running stitch collect the entire fabric and tie it together. Thus we seal the cushion from one of the ends.


      I.            Use poly fiber to fill in the cushion.Now place a thin polyfill sheet on the base of the cushion to have a uniform 
  II.           Spin the poly fiber with hand and then stuff it inside the cushion.


  Once the fiber is stuffed close both the ends. The cushion should look like this.


Finally attach the balls in the center on both sides of the cushion. 
Your cushions are ready!


Monday, 31 October 2011

I Owe You

I Owe You


Love a beautiful expression that completes our life.
I believe it’s important to love yourself first to express it to others. 
This post is especially for a loved one, whom I want to gift the I-pad.

I have thick, black hair with a good volume.They add to my personality. The credit goes to my genes and a coastal diet rich in coconut. Coconuts rich in proteins, are said to be a natural conditioner which ensures smoothness and growth
I have been more than careless for all these years as I had short blunt cut hair which never required much of maintenance. I realized how beautiful my hair was only when I first grew them to shoulder length and had a step cut, to a compliments galore . The step cut complemented my hair because of the volume.

I loved my hair but little did I realize that they had to be maintained. Over a period of time I realized that my hair had split ends and roughness. I never oiled my hair regularly, as it flattened the hair and projected my big forehead like a dart board.  I got to know about hair serums and conditioners through a surfeit of advertisements, which was a welcome option just to escape from oil.

I use dove conditioner after every hair wash as it softens and makes them more manageable. My mentor Mondira   suggested some homemade remedies for rough hair. Honestly, they are inexpensive and harmless as they are natural. I would love to share some of them with the readers.
1.  Oil your hair every alternate days with warm oil and leave overnight.
2.  Make a mixture of curd, fenugreek seeds and lemon juice .Massage it in your scalp and hair. Leave it on for an hour or more , rinse and shampoo. This one works well as it gives shine, softness to the hair.
3.  Make a mixture of egg, oil and lemon like a mayonnaise. You can add some essential oil to remove the pungent odor. This adds volume and shine.
4.  Use a mask of mashed bananas and honey for softening hair and giving it a glossy shine.
5.   Never Use hot water to wash hair but normal water

This is how I care for my hair and they do love me back. There’s a month to go for my wedding and only thing I am sure about is my hair. The dove gift hamper gives me more reason to be carefree. Especially the hair serum it softens my hair and imparts a glossy shine. I conclude by reiterating “ I Owe You”

Friday, 28 October 2011

Happy Deepavali


Fill the Heart with the oil of love.
Place in it the wick of single-pointed mind.
Light it with the Knowledge of Truth
and remove the darkness of ignorance around you.
Just as one lamp can light many lamps;
Let each youth kindle this Light in many hearts.”

How beautifully the significance of the diyas is quoted here.Diwali something that makes me relate to brightly lit streets, diyas,color,rangoli, sweets and colorful lanterns.

As diwali was approaching I could see beautiful earthen and designer diyas, lanterns displayed by the vendors in the market. Shopping on Dadar streets is at its best in Diwali -a place I usually shop from. It gives you a pleasant festive feeling looking at the beautiful ornamented diyas, bright colors and brightly lit lanterns.

Last week when I visited the nearby mall I saw a counter selling traditional diyas and decorative articles. I fell in love with them at the first glance and when I read the price tag on the bottom of the diyas all my love evaporated into thin air.

This is how I came up with an idea to be creative with earthen diyas. It has been a joyful journey of decorating diyas as I also got my first year students involved in this diya making activity. Trust me they came up with incredible ideas.


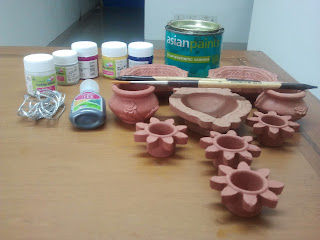
  1. Diyas are a symbol of victory, joy and light. To make a beautiful Diya you would require following things:
  1.  Earthen lamps of your choice
  2.  Acrylic colors 
  3. Varnish 
  4. Paint brushes- 2 and 3nos. 
  5. Glitter tubes 
  6. Candle wax 
  7. Cotton thread
Always wash the lamps and sun-dry them before painting.

Apply a single coat of color, rest it for some time and then apply the second coat. You can mix two colors and get different shades and colors.

After the second coat apply varnish to give a gloss on the lamp and form a protective film over the color 


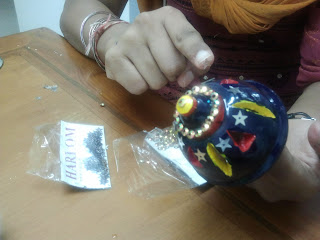
As the varnish is sticky it also acts as an adhesive so you can easily ornament the lamp with mirror or glitter work.


This is the how my decorated diyas looked like


For wax filling 

you easily get candle making kit in stationary shop which can be used for diya making. 

I used a double boiler to heat the wax as direct heat would burn the wax. 

The melted wax solidifies in less time so always be quick to pour in the melted wax in diya with a cotton wick in it. 

To make cotton wick take thick cotton thread and twist 2-3 threads together. hold the thread in the center while pouring the wax. Always coat the tip of the wick with wax so that it burns properly.


One of my students trying out her creativity.


I conducted a diya making activity with the first year students who came out with beautiful diyas which were distributed to all the staff members.


It’s an awesome experience of painting and decorating diyas.Thank you for reading this blog. 

Have a happy deepavali

Thursday, 6 October 2011

Innovative lamp


I have been more than excited to add my new post. It’s the festive month of October -Diwali  the season of light making  its  presence felt.  brightly lit lamps, diyas and variety of sweets is something that you cant take your   eyes off  if crossing a market lane . Innovations are bound to happen when you have a vision and this time it was Veena Picardo who came to me with this brilliant idea of making an innovative lamp 


We have this bougainville plant surrounding our college compound and one day the gardener was busy conditioning the plants. He had cut the old dried twigs out  for the plant to branch again.
It  was veena  to  visualize creativity in those dried sticks which were soon to be  part of  a heart warming lamp. If you have to make a similar lamp you could use any dried sticks that would be flexible enough to take a shape. 


I collected twigs of different sizes and tied each twig into a sphere shape with the coir yarn to give a rustic look. I managed to make 10 rings of different sizes. If you would be using the same plant for the lamp be careful with the sticks as the plant has really sharp thorns. To maintain the dried sticks and for a glossy finish I used a mix of varnish and brown color powder and applied it with a paint brush. All this material is easily available in any Hardware Store.
I


Its important to have small to large size of spherical rings as it becomes easy to entangle them in each other to give a circular shape. 


For hanging the lamp thought of using the coir yarns again. Made a rope  plait out the yarns and got it colored with  the varnish mix.  


You need to rest the rings and rope so that the varnish dries out completely. It may take a day for the varnish to dry completely.


Assembling the lamp:
As the design of the lamp is abstract a perfect  spherical shape was not desired. As the bouganvilla plant dry sticks had thorns it was easy to entangle the rings among each other. If you use different kind of dry stick then use the coir yarn to hold the circular structure. After completion the sphere looks something like this. 


To illuminate the lamp I  have used  Chinese rice lighting which was properly arranged only inside the lamp. 


The thorns on the dry sticks served as attachment for the lighting wire to form a shape.


After the lighting was lit the lamp looked something like this


I wanted to add life to this abstract creation so used the artificial  flower creepers which are easily available in the local market. Starting from the rope the flower vine was set on the sphere in a " S" shape.


The green color added freshness and life to lamp. This lamp  when lit in the dark looks like a cluster of fire flies in  a dense green forest!


Happy dusshra to all  of you ! 


See you soon in my next post.  

Thursday, 29 September 2011

Reduce, Recycle and Reuse


This time I wanted to work with fabric and corduroy is something we all have a set in our wardrobe. I Love the texture quality of the fabric that’s the reason why I never wanted the trousers to be in trash. I had a nice old beige color corduroy trouser which I wanted to bring in use and designing a bag out of the trouser was the best option.


To get started I had these bell bottom type of trousers so I utililized the lower part of the trousers which gave a perfect shape to the bag.

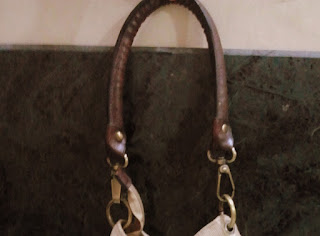
I had an old leather bag which had a functional handle and buckles on sides. The dark brown color of the handle was blending with the beige color so I had nearly figured out the structure of the bag. 


The trousers cut fabric had to be stitched only at the two open ends. For the base of the bag I used a brown leather piece and on top end got a zipper attached.  
For assembling of the bag I took help of the local tailors as the equipment they use give a better finish then hand stitching.


After the bag structure was ready I had to decorate it. If you visit a Fabric market you could find ready to use iron –on fabric patches which are used to decorate a bag. I picked up this patch as it was going well on the cord.


 Before using the iron on patch got the bag pressed to avoid any creases. Placed the patch on the bag covered with thin cotton cloth so heat could easily go in as well as the plastic sheet was not in direct contact with the press.


Anytime using patches make sure you apply pressure and uniform pressing so that the lamination of the patch is perfect.
 After pressing remove the plastic sheet from the design and you could see the design imprinted on the bag. Allow the bag rest for some time.


I have also used black color buttons to highlight the eyes of the cat.
 Try making a bag out of an old but reusable fabric you could use different accessories to decorate the bag.  If you have read this blog please look into your wardrobe you may find a good fabric which could be recycled and reused. Trust me you will love the way the bag comes out.